How to use Whiteboard efficiently in Teams meetings
When you need to collaborate in more visual way with your team, you want to take a look at Microsoft Whiteboard that is automatically available with every Teams meeting. Whiteboard is also a great meeting notes tool since you can write, ink and paste content to it. Not everyone knows what Whiteboard is capable of. You could be the Whiteboard Champion to guide people how to use this tool the best way.
Whiteboard can be used by several people at the same time. It is a true teamwork collaboration tool just like OneNote, Word, Excel or PowerPoint (& others) in the Office 365 toolbox. Co-authoring is very important, since it allows multiple people to enter their ideas, votes and creations to the same canvas at the same time. And it is inclusive since everyone sees the changes every other person did.
Whiteboard or OneNote?
If your collaboration is more text-based I advise to use OneNote. For more visual needs, free form planning or just because you have used to use the physical whiteboard you should start using Microsoft Whiteboard. And what is also great, the Whiteboard app used in Surface Hub is the same than the Windows Desktop app.
If you are good at drawing or possess sketching skills the more I recommend using Whiteboard for meeting notes as well. Both Whiteboard and OneNote has its strengths and downfalls so it is good to understand which tool works for your team/project and why and in which scenarios.
Formal meetings usually have meetings notes in OneNote (better structure, notes in one book) while Whiteboard is most often the virtual counterpart of physical whiteboard. However there are also more use cases for Whiteboard than just being a digital paper.
Currently within your organization only
Note: Whiteboard can be currently used within your organization only. You cannot share it to others for editing unless you all use consumer Microsoft Accounts (not advised).
You can share Whiteboard as ”view only” to externals in meeting by sharing your screen (share desktop) and dragging Whiteboard App to that shared screen. Participants can then see what you are sketching or applying to the board and can give feedback by voice/chat.
Whiteboard could be used instead of PowerPoint to present ideas and solutions to attendees and it doesn’t matter if they inside or outside of your organization.
Whiteboard app in Microsoft Store
Actions in the meeting invite
You can engage the Whiteboard already when you do the meeting invitation. It is a good practice to tell other attendees about the Whiteboard and do some preparations. On top of meeting agenda it is good to have a small checklist and a reminder where meetings notes will be in.
This is also a good moment to bring to your attention that the Teams meeting scheduler has been updated:
Recipient/attendee can now RVSP directly and visually from Calendar invitation in Teams, without having to take a trip to Outlook.
And meeting organizer can see directly who had accepted or not. You can change meeting timezone also from within Teams meeting dialog! This is a great addition that enables me to keep Outlook closed for even longer times & letting me to worry about emails when it is their time.
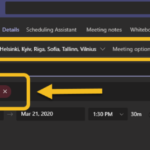
And as you can see in that picture, I can now access meeting Whiteboard as well -without opening the meeting first. This enables me to prepare the Whiteboard for the meeting.
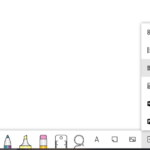
Microsoft Teams Whiteboard view only has a few pens and erasers. However, we can take it to the next level by opening Microsoft Whiteboard app.
Whiteboard tools
Whiteboard is extremely usable for teamwork collaboration online. Learn which capabilities work the best and in which situation. And the tool will only get better – remember that it is one of the most important Surface Hub applications.
When using the Whiteboard Desktop app, instead of just a few pens we have several pens and other tools like
- marker / highlighter
- eraser (remove any ink/drawing – doesn’t work to shapes)
- ruler (draw straight lines)
- lasso selection
- Text (write text)
- Notes (post-it notes)
- Image menu (add from library, from Bing or take a picture using device camera)
- List of tools
- Undo
- Redo
Compared to the physical whiteboard we have just gone interstellar!
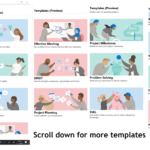
Templates
One really great addition is Templates, which are in preview currently. Templates enable you to structure you meeting more and they typically have some text and different note grids that allow you to add notes to different containers.
It is good to note that some features (Templates, List and Notegrid) are not visible in Teams/Web/Android version of the Whiteboard. If you need to display your Whiteboard in Teams share (not using desktop sharing of Whiteboard app) then stick to non-preview features.
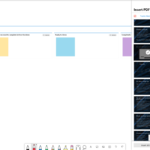
Embedding content
You can also easily embed selected slides/pages of documents into the Whiteboard. This is very useful if you have a RFP or specifications that are not going to change (no need to update) often but are good to be visible during the planning.
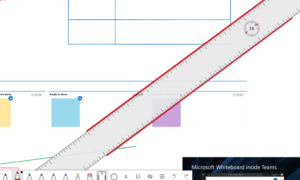
With the ruler you can draw straight lines and keep the ruler ”on the board” visible and easily usable until you toggle it off. You can move it around with just a one finger drag to move it in its place (or away) and use intuitively two fingers to change its angle. And yes – you can draw straight lines using it’s both sides.
Settings
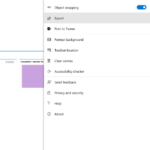 Let’s take a look of some of the most useful settings.
The Whiteboard menu is somewhat different if you have an active pen on or off. Select the one you like the most.
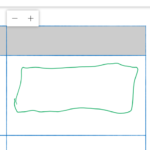
Ink to shape allows you to draw squares/triangles/ellipses and Whiteboard app corrects them to look better.
Ink to table allows you to draw a table just by drawing a square and then start adding horizontal and vertical lines there to add more columns. If you in inside a cell it will automatically resize, however ink to shape is not active then. If you select the table you can also click on +/- to add/remove columns and rows.
You can also use Settings menu to post a link to Whiteboard to Teams channel. Just remember to add permissions too. Exporting Whiteboard allows you to export it as a image (png or svg).
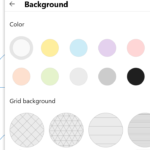
Of course, don’t forget the format background to make Whiteboard your own looking.
In these times when we suddenly need to work remotely more than ever, it is a good idea to learn how to use digital counterparts of these tools we have used in physical meeting rooms. Let’s make the best out of this unfortunate event in human history and learn how to use tools so we can work even better than we did before. Perhaps it will be a result of these tides that drives the change for us to work more online in the future as well.
This article is a shortened version of my article “How to use Whiteboard in Teams meetings efficiently II”. See to it if you want to see more detailed info on how to do the activities mentioned here
If Whiteboard is new to you or your meeting participant, read my article How to use Whiteboard in Teams meetings to learn basics of the Whiteboard.
Embedding content
Whiteboard templates
Whiteboard table
Whiteboard background